
Viasue & Race Coordinator's USB Plug & Play Product Information
Base USB System
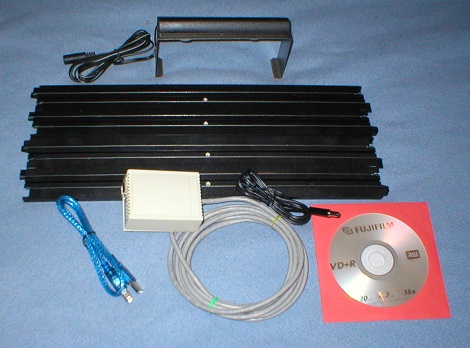
The Base USB System is a 100% Plug & Play Unit that comes with all the hardware and software needed for lap counting and race management. You get everything you need for hardware and software for basic lap counting and race management which includes:- A CD that auto installs & auto configures the required hardware and software for you
- Option rich, accurate & very stable running Race Coordinator race management software
- State of the art Slot Car Racing Arduino microprocessor for very accurate racing control & for very reliable race data input and output
- Reliable, sensitive & accurate solid state photocell sensors for accurately tracking laps of all car, trucks and scales
- Professionally installed hardware system installed for you in the plastic track of your choice and scale
- 10 foot sensor cable to connect directly to your PC USB Port,
- 10 foot light bridge power cable
- Unique Light Bridge Design that uses power from the same PC USB connection
- Q&A support online and off line via the Web or setup CD
- If trouble shooting is needed it comes direct from the hardware & software designers, the horses mouth so to speak
- Elimination of heavy WalWart power adapters, which lowers shipping costs
- Only 1 USB port is needed, which leaves other ports types including other USB ports available for muti track set up
- No port to port adapters required
- Plug & Play All The Way
The hardest part is left up to you.......making & breaking new track, driver & car records ;>)
Add-Ons
In addition to the base model, the following list of add-ons are available. Please contact us for for a complete list of add-ons and pricing:- Call buttons options
- Master power relay options
- Per lane power relays options
- Longer USB cables all scales
- Longer Sensor track / PC cable all scales
- Infrared (IR) Emitters invisible light for all scales
- Custom built LED light bridges all scales
- Coupled Connections for smaller opening in the table top
You only pay for what you get....no fluff or unwanted extra parts or features just the stuff ya need and or want!
But there is nothing wrong with a maxed out system with all the bells and whistles we can provide !
Pricing
For an up to date product and price list, including potential add-ons listed or not listed here please visit the Viasue website or contact us at:'contact@racecoordinator.net' or 'viasue@viasue.com'
Charity
All proceeds from the sale of this platform received by Race Coordinator will be donated in full to one of the charities Race Coordinator fund raises for. So you get a great product and a very good cause receives a donation. Everybody wins!Images
 |
Front side of the timing setup. This a 4 lane HO configuration. The sensors are professionally installed flat into the track piece so there's no chance the car will hit the sensor and deslot |
| Back side of the sensor track. The sensor wireing is professionally secured and encased to prevent accidental damage. | 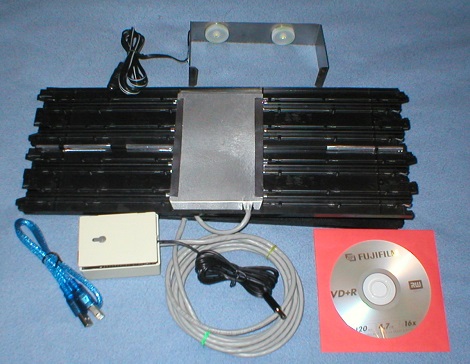 |
Installation Instructions
For a product that "just works", simply following the following installation steps:- Power off your race computer
- Remove all components from the packaging and inspect them for physical damage. If anything appears physically damaged please do not delay and contact us for further instructions
- Install your new sensor track pieces in your layout. Although housing has been professional secured, take care not to be too rough with the installed sensors and the underside wiring
- You will notice a notched area in the protective wire cover under the track. This is used with great care so you can, more easliy redirect the cable through the table top or leave as is out the side
- Install the light bridge by centering front to back and side to side over the sensors installed. Be sure the light bridge power cable is on the same side as the PC sensor cable in your track
- With the PC off, Plug the sensor cables and light bridge cables into the provided micro-processor connections
- With the PC off, Plug the USB cable into the micro-processor unit
- With the PC off, Plug the PC end of the USB cable into your PC
- Power on your race computer only after connection of all of the
hardware
- If or When Your Windows PC asks / offers to Install Software Drivers or software files "Cancel / Abort Windows effort to install it's software driver files."
- The RMS software driver installation will handle software driver install for you automatically, by installing the proper software drivers, that have been tested for your system.
- Insert the installation CD into your PC CD-Rom drive
- The RMS installer on the majority of PC's will auto-run, however if it does not, browse the CD and double click the "RaceCoordinator_v*.exe" file to run the installer manually
- The installer will install .NET 4 if need be and the Arduino drivers. If you are prompted with windows dialogs asking if this is okay please make sure to accept the installs, including accepting un-certified drivers and such.
- The installer will auto-configure the RMS for you. However you must give it permission to by selecting your track and clicking "Auto Configure"
- If this is the first time you've installed Race Coordinator, there will be only one track and it will be selected by default, simply click "Auto Configure" and the installer will do the rest.
- Once installed you should be ready to race. Race Coordinator comes with some default drivers icons and race configurations. Give them a try and have fun!
- To quickly and correctly understand all of the great features in RC please visit the online RC video tutorials
Technical Support/Questions/Comments
- For software support please check out the RC's Frequently Asked Question
section.
- For software configuration tutorials please checkout our Online Video Tutorials/Race Formats
- Still can't find the help you need? Feel free to email us at
'contact@racecoordinator.net' or 'viasue@viasue.com'


Race Coordinator Copyright (C) 2010-2012 DPASoft